The purpose of this lab is to:
- Learn about reading from files
- Practice using lists
- Explore the Game of Life
- Animate a simulation
Before you begin, please create a folder called lab05 inside your cs150 folder. This is where you should put all files made for this lab.
Part 1 - Looking for a Match
20 points, individual
As you may know, proteins are chains of molecules called amino acids. There are 20 amino acids, each of which is typically represented by a single letter, and any protein can be specified by its sequence of amino acids. This sequence determines the properties of the protein, including its 3D structure.
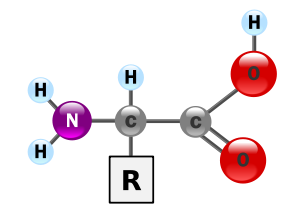
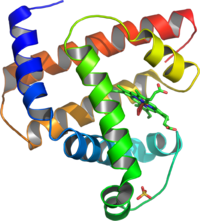
Right: 3D structure of a protein. Image source: wikipedia.org.
When a new protein is found, one way in which we might attempt to guess the functionality of that protein would be to see if it contains certain markers common to a known class of proteins. For example (and an entirely bogus example at that), suppose we discover a new protein, that we've named Duane, with the following amino acid sequence:
STTECQLKDNRAWTSLFIHTGHTECA
We may also suspect that Duane might belong to one of two possible classes of proteins: Splunkers and Munkatoos. As you well know, most Splunkers contain the pattern TECQRKMN or at least something close to it. That is, most of the sequences in the class of Splunker proteins have the subsequence TECQRKMN with only a few of the letters changed. Munkatoos, meanwhile, have the pattern ALFHHTTGT, or something very similar.
In this case, we can deduce that Duane is most likely a Splunker: Duane contains the pattern TECQLKDN which only has 2 mismatches from TECQRKMN (the errors are marked with a ^ below).
TECQLKDN
TECQRKMN
    ^ ^
The closest pattern to the Munkatoo sequence is
SLFIHTGHT
ALFHHTTGT
^  ^  ^^
which has 4 mismatches.
Describe the Problem:
Write a program match.py that patterns matches as follows.
input: a file that contains a string s representing a protein sequence, along with some number of strings, each representing a pattern sequence.
goal: for each pattern sequence, find its best match in the protein sequence and report its location and the number of errors in the match.
Understand the Problem:
The file test.txt is in the format you should expect for your input (and is the file you should use to test your program). In particular, the first line will always contain the protein sequence. Following the protein sequence will be some number of pattern sequences. For each of these sequences, you should report the location of the best match, and the number of errors at that location.
For example, the contents of test.txt are as follows:
STTECQLKDNRAWTSLFIHTGHTECA
TECQRKMN
ALFHHTTGT
TTECQ
HT
ZZZ
TTZZZRAWT
For this file your program should have something like the following output:
Example Output
Sequence 1 has 2 errors at position 2.
Sequence 2 has 4 errors at position 14.
Sequence 3 has 0 errors at position 1.
Sequence 4 has 0 errors at position 18.
Sequence 5 has 3 errors at position 0.
Sequence 6 has 5 errors at position 5.
Design an Algorithm:
Make sure you come up with a plan of attack (on paper) before you begin coding.
Implement a Design:
Unlike previous assignments in which data was entered by the user or hard-coded into the program, here your data will come from a file. As such, you'll need a few tools for handling files.
Reading from a File
To work with an external file, you'll use the open function:
<variable> = open(<filename>, <mode>)
This function opens the file with the given name and loads it into the specified variable. The <mode> can be either "r" or "w", depending on whether you intend to read from the file or write to the file (you can only do one type of operation at a time). In this case we're just reading from the file, so you'll want something like this:
inputFile = open("test.txt","r")
You can now use functions associated with a file object, including:
- <file>.read() Returns the rest of the file as a single string.
- <file>.readline() Returns the next line of the file as a string.
- <file>.readlines() Returns a list of all remaining lines.
Keep in mind that the lines returned by all these functions include the newline character at the end of each line. So if you call the print function on one of these lines, you'll print two newlines (creating a blank line). If you want to avoid this, you can either tell print not to add a newline at the end (end='') or you can just work with all but the last character in the line (myLine[:-1]).
You can also use a for loop to iterate through all the remaining lines in the file. For example,
 	for line in inputFile :
 	   print(line[0],len(line))
will print the first character and the length of each line in the file. Note that if some lines had already been read before this for-loop, those lines wouldn't be interated through.
Your program should allow the user to pick the name of the file to be read. You can make sure your program works by creating other txt files and testing it on them. Be sure your program works for an arbitrary number of sequences. I.e. don't have a loop that is coded to grab 6 lines and then stop; there may be more or fewer. Using the for-loop to iterate through the file is helpful here.
Test the Program:
Try your program on a variety of sequences and inputs. Make sure the program still works when the protein sequence or some pattern sequence is empty.
Maintain:
Make sure your code is "readable": use short but meaningful variable names, use constants where appropriate, use functions where you can, and comment any code that does anything substantial (for example, it would be a good idea to put a comment before your for loops explaining the purpose of the for loops, before each function explaining the function's parameters and purpose, etc.) It is not necessary to comment assignment statements and simple things like that.
You should also handle exceptions so as to make your program robust to runtime errors (e.g. the user if enters a file name that doesn't exist).
Handin
Be sure to hand in what you have finished so far.
Part 2 - The Game of Life
20 points, partner
The Game of Life, created by mathematician John Conway, is what is referred to as a cellular automaton. It is a set of rules which are used to generate patterns that evolve over time. Despite the name, the Game of Life is not a game; it is really a simulation. In some ways, it can be thought of as an extremely simplified biological simulator which produces unexpectedly complex behavior.
The Game of Life is played on an infinite board made up of square cells. It takes way too long to draw an infinite board, so we'll make do with a small finite piece. Each cell can be either live or dead. We'll indicate a live cell as a red square, and a dead cell as a black one. The board begins in some initial configuration, which just mean a setting of each cell to be either live or dead (generally we'll start mostly dead cells, and only a few live cells).
The board is repeatedly updated according to a set of rules, thereby generating a new configuration based on the previous configuration. Some dead cells will become live, some live cells will die, and some cells will be unchanged. This configuration is then updated according to those same rules, producing yet another configuration. This continues in a series of rounds indefinitely (or until you get bored of running your simulation).
Rules of Life
The rules are pretty simple: to figure out whether a cell (x,y) will be live or dead in the following round, you just look at the 8 neighbors of that cell (those that share a corner or an edge, so N, S, W, E, NW, NE, SW and SE). What happens to (x,y) next round depends on the number of its neighbors who are live and whether it is currently live or not. In particular:
- If a cell has 4 or more live neighbors, it dies (overcrowding).
- If a cell has 0 or 1 live neighbors, it dies (loneliness... *sniff*).
- If a cell has exactly 2 live neighbors, nothing changes (if it was live, it stays live, if it was dead, it stays dead).
- If a cell has exactly 3 live neighbors, it comes to life (I don't have a good explanation for this one, but it does seem to make for cool patterns).
For example, consider the following 3 initial configurations, and the two configurations that follow each.
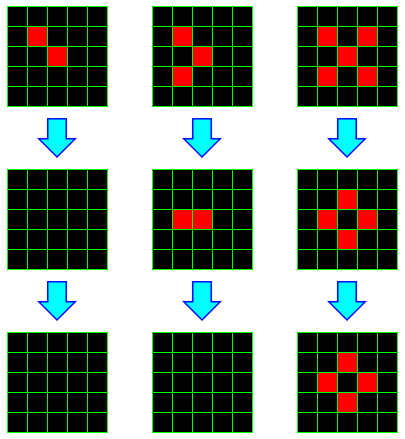
In the first example, both live cells have only one live neighbor, so they both die. Any dead cell has at most two live neighbors, so no new live cells spawn. Thus in one step, there are no live cells. Clearly, at this point, the configuration is stable.
In the second example, two live cells have only one neighbor, so both die. But the third cell lives, and the cell to its immediate left has exactly 3 live neighbors, so it spawns. On the next iteration, we find ourselves in a case similar to the previous example, and all cells die.
Note that we can't set a cell to be live or dead the instant we determine its status for the subsequent round; we will likely need to know whether it is alive or dead on this round to determine the future status of other nearby cells. To see this, consider the second example. We can immediately tell that the top-most live cell will die. But had we set it to dead immediately, then when we got to the second live cell, it would have only had 1 live neighbor and we would have (erroneously) determined that it too must die. Thus it is critical that we first determine for every cell whether or not it will be live, and only after doing so update the status of each.
In the last example, all currently living cells die; the middle cell has too many neighbors, and the other have too few. However, four dead cells have exactly 3 live neighbors, and so those cells spawn. In the following round, there are neither cells that die nor cells that spawn, so we have a stable configuration. In general, a pattern that doesn't change is called a still-life.
While all of these patterns stabilized quickly, some patterns take a long time to stabilize, and some never do. Of those that never stabilize, some at least have a regularity to them; they eventually eventually repeat states. These are said to be oscillators. Others never repeat the same state again, and produce an infinite number of configurations.
Describe the Problem:Write a program life.py that simulates the game of life for a given number of iterations, displaying the state of the board graphically at each step.
Understand the Problem:
Make sure your answers from your prelab were correct. If not, go back and figure out what went wrong.
Design an Algorithm:
Let's think about how we might go about setting up our Life simulator. Since this program is relatively complex, we won't try to get everything working at once. For example, we won't do anything graphically until the logic of the simulation is working.
So what components do we need to run our simulation? First, we'll want to keep track of our current board: which cells are alive, and which aren't. We'll encode these with a 2-dimensional table of integers (a list of lists), called board, using 1 to represent live cells and 0 to represent dead cells.
Now let's think about how to perform a single update to board. At a high level, we simply want to update every cell in board. But remember, we'll run into problems if we update one cell and then update the cell next to it, since each update needs to be done as if none of the others have been done. To solve this, we'll do our updates on a new board, cleverly called newBoard, based on -- but without changing -- the original board. Now we can view our overall strategy as follows:
- Declare and initialize board and newBoard.
- Assign board whatever starting configuration you'd like.
- Update each cell in newBoard according to the rules of Life, referring to board to count the number of live neighbors for any given cell.
- Swap board and newBoard so the process can be repeated.
- Print the contents of board.
This list immediately suggests a few functions that will be useful to create: a function to print the board in a manner as suggested on the prelab so we can see if things are working; a function that creates a board of zeroes of a given width and height; a function that counts the number of live cells neighboring a particular cell in an array; and finally, a function that uses the previous function to update a board.
As we saw in class, we can make a two dimensional array -- a list of lists -- with all values initialized to 0 as follows:
   a = []
   for i in range(w) :
      a.append([0]*h)
Something like
a = [[0]*h]*wdoesn't give us what we want? Why not? Hint: what happens when we change a single entry in this table?
The edges of the board tend to be problematic. For example, if you are considering cell (WIDTH-1,HEIGHT-1) and you attempt to check the liveness of its neighbors as you would for most cells, you'll end up attempting to access positions whose indices are too large. You may have run into this problem in the previous lab doing operations such as blur.
One natural fix is to simply create a board that is 2 units taller and 2 units wider than you actually want, and only do updates on non-border cells. This approach would work fine, but on this lab you're going to do something a bit different; we're going to use a torus rather than a plane for our game board. A torus is just the technical name for the shape of a donut.
OK, so what does that mean here? It means that if you were to walk off the right side of the board, you'd appear on the left side at the corresponding position, and vice-versa. Likewise if you walked off the top of the board, you'd appear on the bottom. This means every cell has 8 neighbors now. Consider cell (0,0). It has the 3 obvious neighbors in the directions E, SE and S. If we want to find the N neighbor, we have to wrap around the top of the board, bringing us to (0, h-1). Similarly, the NE neighbor would be (1, h-1). The NW neighbor would be (w-1, h-1), and so on. One reason this is so handy is that if you use the mod operator appropriately, you don't need any special cases to handle edges or corners.
Alright, so what did this have to do with donuts? Well, since the top of the board is now effectively connected to the bottom of the board, you could imagine the board as a flexible square of rubber, and this connection could be represented by gluing the top edge to the bottom edge. Now we've created a rubber tube. But the left and right edges are also connected. If we bend our tube and glue these edges together, we've created a torus. Mmmm... donuts.
Implement a Design Start by implementing the basic algorithm we discussed above. Create the functions described above, and test each function after you've created it to make sure it works properly. Declare two class constants HEIGHT and WIDTH representing the size of your board, and hard-code a starting configuration so you can tell whether your simulation does what it is supposed to.
Once you've got these basic pieces working and can simulate a single step of Life and display the results to the terminal, add the following features.
Iterate: Declare a class constant called ROUNDS and run your simulation for that many iterations.
Pictures: To create an animated visualization of life, we'll be using the original picture.py module. In particular, you'll want to make use of the functions
   pic = picture.Picture((w,h))	    # create a w-by-h pixel picture object
   pic.setFillColor((r,g,b))	    # set shape fill color to (r,g,b)
   pic.setOutlineColor((r,g,b))	    # set shape border color to (r,g,b)
   pic.getWidth()                   # return the picture width in pixels
   pic.getHeight()                  # return the picture height in pixels
   pic.drawRectFill(x,y,w,h)        # draw a w-by-h rectangle with upper-left corner at (x,y)
   pic.display()                    # display any updates in the picture to the screen
This would be enough to get things up and running, but if you repeatedly drew the board using drawRectFill, you'd notice that your program would start to slow down considerably within a few seconds. The problem is that when you call the drawRectFill function, your picture object actually creates its own object -- a rectangle object -- that is drawn on the canvas every time the picture gets redisplayed. If, on every iteration of the simulation, you add a whole board's worth of rectangles, this becomes increasingly inefficient.
To get around this problem, you'll make use of a function available to all the shapes you can create in the picture module.
s.changeFillColor((r,g,b)) # changes the fill color of shape sOf course, to call this function, you'll need to have a handle on the shape s. Luckily, when you call drawRectFill in the picture module, this actually returns a pointer to the shape object created by that call. So the plan is to make another two-dimensional array containing pointers to all the rectangles used in the board.
First, make a two dimensional array called tiles with one entry for each tile on the board. For simplicity, reuse your function that make a board of zeros, and we'll replace them with actual tiles next.
Second, for each tile on the board, use drawRectFill to draw a black (for now) square in the appropriate position on the board. Assign the result of that function call to the corresponding position of tiles.
Now you should be able to update the board with an instruction like
tiles[x][y].changeFillColor((r,g,b))
Aging Cells (Optional): Keep track of how many rounds each live cell has been alive, and color the cell based on that age. For example, you might have newborn cells begin red but slowly turn blue as long as they stay alive.
Initial Conditions: Set your class constants so that the board size is 50-by-80 tiles, each tile is 6-by-6 pixels, and the simulation runs for 500 iterations.
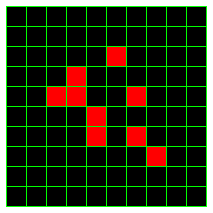
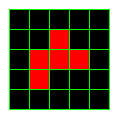
Initial Configuration: Create 3 (or more if you want) preset configurations that the user can choose from for the starting condition. The first starting configuration should include just the 5-cell pattern below, somewhere in the middle of the board. For the other two, find a couple configurations that generate interesting effects.
Test the Program:
Try your program on a few of the configurations you've solved manually. Make sure the program works properly not just on the first iteration, but on subsequent iterations as well. Does the simulation behave correctly on the edges of the board? If something isn't working, what functions might you add to try to pinpoint the problem?
Maintain:
Make sure your code is "readable": use short but meaningful variable names, use constants where appropriate, use functions where you can, and comment any code that does anything substantial (for example, it would be a good idea to put a comment before your for loops explaining the purpose of the for loops, before each function explaining the function's parameters and purpose, etc.) It is not necessary to comment assignment statements and simple things like that.
Handin
Be sure to hand in what you have finished so far.
Handin
If you followed the Honor Code in this assignment, insert a paragraph attesting to the fact within one of your .py files.
I affirm that I have adhered to the Honor Code in this assignment.
You now just need to electronically handin all your files. As a reminder
     % cd             # changes to your home directory
     % cd cs150       # goes to your cs150 folder
     % handin         # starts the handin program
                      # class is 150
                      # assignment is 5
                      # file/directory is lab05
     % lshand         # should show that you've handed in something
You can also specify the options to handin from the command line
     % cd ~/cs150     # goes to your cs150 folder
     % handin -c 150 -a 5 lab05
File Checklist
You should have submitted the following files:
   match.py
   life.py
If you worked with a partner, they will turn in life.py with both of your names in it, and you will turn in a README with their name.
T. Wexler, A. Sharp, C. Taylor.