Due 10:00pm, Sunday, October 01, 2017
In this lab you will use the power of a stack and a queue to explore and find your way through a maze. The purpose of this lab is to:
This lab is a little larger than past labs; it has many different pieces that all need to work together. Most pieces are small, but it may take some additional patience on your part. Just chug along and the end will show itself in due time!
You may work with a partner on this assignment -- both during and after the lab session.
You are part of a science research team exploring the vast canal systems on Mars. Due to the harsh surface conditions, all of the exploration is done through the use of remote controlled robots. To explore an area, you drop in a large rover-bot that needs to make its way to a different pick-up point. Each rover-bot has a large army of smaller probe-bots that can be used for to scout the route.
Unfortunately, the probe-bots have to be manually controlled, and only one group can move at a time, and only explore one new square at a time. I think the software may have been written by an earlier CSCI 151 class. :-) These probe-bots travel in small swarms, so groups can be left to explore in different directions at each intersection.
Two of your colleagues (Susan Queue and Haywood Stack) have been arguing about the best way to use the probe-bots to scout a route for the rover-bot. Susie thinks that the locations should be scouted in a first-come, first-served fashion, while Hay thinks that you should focus on the most recently explored areas first. (The captain Rex Ursvie has a different approach based on earlier technologies and is just staying out of the discussion.)
Your job is to simulate the various approaches using your nifty CSCI 151 skillz the examine the different approaches suggested by Susie Queue and Hay Stack.
I've supplied starting point code, including some sample mazes here: MazeApp.zip.
In this lab I won't be giving you any *.class files, just *.java source files. Remember, to get Eclipse working with these you should do the following:
First let's talk about your basic maze. It has walls and pathways, and it has one (or more) starting point(s) and one (or more) exit point(s). (To keep things simple, let's just assume it has no more than one of each.) Furthermore, one wall is just like another, and any open space (not including start and finish) is also identical. So, we can think of a maze as being made up of individual squares, each square either empty, a wall, the start, or the exit.
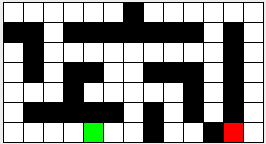
Below is a graphical representation of the maze found in the file maze-2. The green box represents the start, the red box the exit, and the black squares the walls.
We represent such a maze with a text file of the following format. The first line of the file contains two integers. The first indicates the number of rows (R), the second, the number of columns (C).
The rest of the file will be R rows of C integers. The value of the integers will be as follows:
    0 - an empty space
    1 - a wall
    2 - the start
    3 - the exit
In terms of coordinates, consider the upper left corner to be position [0,0] and the lower right to be [R-1,C-1].
For example, this is the text version of the maze above (start is at [6,4] and exit at [6,11]).
7 13
0 0 0 0 0 0 1 0 0 0 0 0 0
1 1 0 1 1 1 1 1 1 1 0 1 0
0 1 0 0 0 0 0 0 0 0 0 1 0
0 1 0 1 1 0 0 1 1 1 0 1 0
0 0 0 1 0 0 0 0 0 1 0 1 0
0 1 1 1 1 1 0 1 0 1 0 1 0
0 0 0 0 2 0 0 1 0 0 1 3 0
Make a class Square that represents a single square in the maze. A Square should have a class variable that represents its type (space, wall, start, or exit). It is your own design decision whether you want to make this variable an int or a char or something else. Regardless, you should define constants to represent the four starting types of squares.
It turns out that later it will be useful if a Square knows where it is positioned in the maze. Therefore, you should give each Square a private variable of type int named row and col to represent it's location within the maze.
Please also include the following methods in your class:
    _ - empty space (0)
    # - wall        (1)
    S - Start       (2)
    E - Exit        (3)

    o - is on the solver work list
    . - has been explored
    x - is on the final path to the exit
Be aware that you might be changing this class later.
Now we can pretty easily set up the maze itself. Create a Maze class that stores the logical layout of a maze. It should contain (as a class variable) a 2D array of Squares. Initially, this array will be empty and you will use a method to populate it.
As you begin working on Maze.java don't forget to also create MazeTest.java with JUnit test cases for the various methods.
Please include the following methods in your Maze class:
loadMaze() method described next.
load the maze that is contained in the file named fname. The format of the file is described above. As a quick refresher, here is how you can declare a 2D array and fill it:
private Square[][]  maze;   // somewhere as a class variable

/* ... */

this.maze = new Square[numRows][numCols];

for (int row=0; row < numRows; row++) {
    for (int col=0; col < numCols; col++) {
        maze[row][col] = null;
    }
}
null values.
    _ _ _ _ _ _ # _ _ _ _ _ _               ______#______
    # # _ # # # # # # # _ # _               ##_#######_#_
    _ # _ _ _ _ _ _ _ _ _ # _               _#_________#_
    _ # _ # # _ _ # # # _ # _      OR       _#_##__###_#_
    _ _ _ # _ _ _ _ _ # _ # _               ___#_____#_#_
    _ # # # # # _ # _ # _ # _               _#####_#_#_#_
    _ _ _ _ S _ _ # _ _ # E _               ____S__#__#E_
To keep things running quickly for larger mazes, you should use the StringBuilder class, which sort of works like an Arraylist, but for Strings. For example, you should replace the following O(n2) code
String s = "";
for( int i=0; i < data.length; i++ ) {
    s = s + data[i];
}
with the better O(n) code
StringBuilder sb = new StringBuilder();
for( int i=0; i < data.length; i++ ) {
    sb.append(data[i]);
}
String s = new String(sb);
See p584 of Weiss for reference, if you like.
Before you continue, you should test that your Maze class works correctly. You can do this by, that's right, creating a JUnit test. Among other things, this test should load a maze from one of the supplied files, get the neighbours of some specific square (the start square, for example), and assert that (1) there are the correct number of neighbours, and (2) the neighbours are in the correct locations. You probably should do this for the corners and border cases, at least. There should also be a test to print out the maze, and to confirm your getStart and getFinish methods return the correct squares.
You may assume that any well-formed maze will have exactly one start and exactly one finish. You may not assume that all valid mazes will be entirely enclosed within walls.
Methods are specified in the interface files supplied in the starting point code. Be sure to throw the correct exceptions. If you get stuck, you can always peek at the text to help you out. Don't copy anything directly, but you may use it as a guide. This part of the lab is not meant to take you very long, so if you find you are spending a lot of time on it, check with the text to make sure you are on track.
For the linked Queue implementation, you might want to make a protected class to handle the nodes. You don't need to create a separate file to do this, instead just have the class description in the same file as MyQueue but without the "public" modifier.
Before continuing, you should add JUnit tests for MyStack and MyLinkedQueue that performs testing on your data structures. (Call these MyStackTest and MyLinkedQueueTest.) Don't forget to test the exceptions too. If you'd like to test your datastructure by confirming it matches the behaviour of Java's (highly recommended), the closest structures are Stack and ConcurrentLinkedQueue. Notice that the names of the functions are different, so you'll have to make that adjustment in your testing code.
Now that you have a maze and working stack and queue data structures, we can use them to solve mazes! You'll next be implementing the application portion of this lab, writing up MazeSolver classes which will bundle up the functionality of determining if a given maze has a valid solution. That is, whether you can get from the start to the finish without jumping over any walls.
Our maze solving algorithm goes something like this: begin at the start location, and trace along all possible paths to (eventually) visit every reachable square. If at some point you visit the finish Square, it was reachable. If you run out of squares to check, it isn't reachable.
Boiling this down into pseudocode, we have the following:
At the start
Each step thereafter
Note that this pseudocode is entirely agnostic as to what kind of worklist you use (namely, a stack or a queue). You'll need to pick one when you create the worklist, but subsequently everything should work abstractly in terms of the worklist operations.
Thus, you will create an abstract class MazeSolver that will implement the above algorithm, with a general worklist. Its abstract methods will be implemented differently depending on whether the worklist is a stack or a queue. The MazeSolver class should have a non-public class member of type Maze, and should have the following methods:
The MazeSolver constructor should take as a parameter the Maze to be solved, and should perform the two initialization steps of creating an empty worklist (using the makeEmpty abstract method) and adding the maze's start location to it (using the add abstract method).
Now we just need to actually create two different implementations of the MazeSolver class. Create two new classes MazeSolverStack and MazeSolverQueue that extend the MazeSolver class. These will not be abstract classes, and so you must implement the MazeSolver's abstract methods. Each class should contain as a class variable a worklist of the appropriate type (so, MazeSolverStack should have a class member of type MyStack<Square> and MazeSolverQueue should have one of type MyQueue<Square>). All you have to do to implement the abstract methods is perform the appropriate operations on the stack or queue class member. For example, the MazeSolverStack add method may look like this:
public void add(Square sq) {
    stack.push(sq);
}
So, as you can imagine, this part will not take you very long.
Don't forget to include a call to super(maze) as the first line of your constructor.
Also, for testing purposes, give both MazeSolverStack and MazeSolverQueue main( ) methods that get a maze from the command-line argument, create the appropriate type of worklist, call the solve( ) method to find a solution and then print the resulting path, if there is one.
In order to output the solution to the maze in step 3 of the algorithm, you will need to keep track of the path that was followed in your algorithm. This seems to be a difficult proposition; however, you've already done most of the work when you marked your worklist nodes using the previous variable. Let us explain.
In order to keep from wandering in a circle, you should avoid exploring the same location twice. You only ever explore locations that are placed on your worklist, so you can guarantee that each location is explored at most once by making sure that each location goes on the worklist at most once. You've already accomplished this by "marking" each square that you place in the worklist.
You are marking the square by putting an arrow in it that points back to the square from which you added it to the worklist. Now, when you are at the exit, you can just follow the arrows back to the start.
Of course, following the arrows gives you the path in reverse order. If only you had a way to keep track of items such that the Last item In was the First item Out, then you could read all the arrows in one pass and write them back out in the correct order...
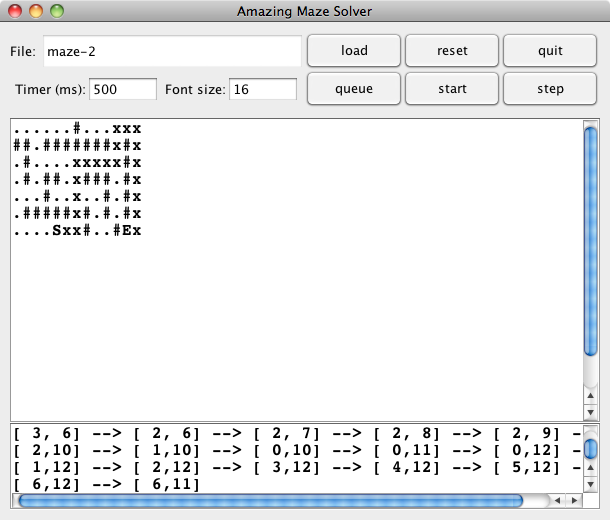
If everything is working in your Maze and MazeSolver classes, you should be able to run the MazeApp program and get a GUI interface that will allow you to animate the process of finding the solution of the maze.
You should not need to modify anything in this file. However, this is a relatively new GUI, so if you notice anything not working correctly or if I am making some unstated assumptions about your Maze/MazeSolver, let me know ASAP so I can get an update out.
Click to enbiggen:
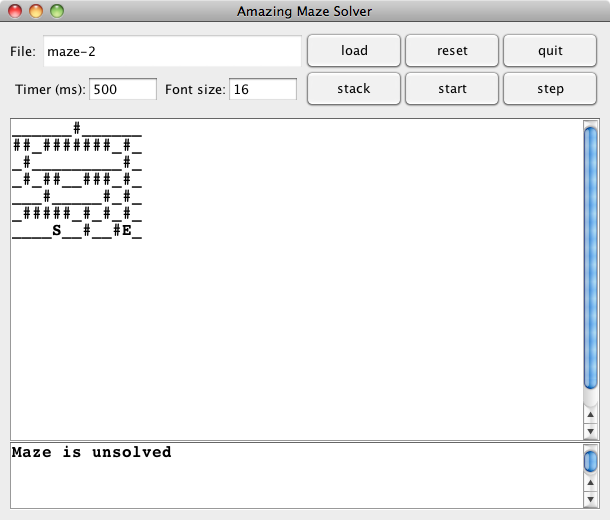

The load and quit
buttons operate as you might expect. The reset
button will call the Maze's reset() method and then create a new MazeSolver.
If you click on the stack button it will toggle
between using a Stack or Queue to solve the maze. The
step button performs a single step of the
MazeSolver and start will animate things taking
one step per timer delay interval.
Don't forget to hit Enter after changing values in the textboxes.
Your Maze's toString method is used to display the maze in the main window, and the getPath() method from MazeSolver is used for the bottom window.
Create a plain text file called "README" that contains the following information:
You should be using Javadoc style comments in your programs. You don't need to generate the HTML output, but you do need to be writing them.
Look through your programs and make sure you've included your name at the top of all of them.
If you adhered to the honor code in this assignment, add the following statement to your README file:
I have adhered to the Honor Code in this assignment.
You now just need to electronically handin all your files. Assignment is 3.
Don't forget to run lshand and verify that things were submitted.
I've got some bigger mazes for you to try out once your program is working.
