
| Contents | Previous | Next |
The Java 2D API supports three imaging models
The following table contrasts the features of each of these imaging models.
This chapter focuses on the objects and techniques of the immediate mode imaging model. The immediate mode imaging classes and interfaces of the Java 2D API provide techniques for dealing with pixel mapped images whose data is stored in memory. This API supports accessing image data in a variety of storage formats and manipulating image data through several types of filtering operations.
The immediate mode imaging APIs in the Java 2D API can be grouped into six categories: interfaces, image data classes, image operation classes, sample model classes, color model classes, and exceptions.
The immediate mode imaging model supports fixed-resolution images stored in memory. The model also supports filtering operations on image data. A number of classes and interfaces are used in this model.
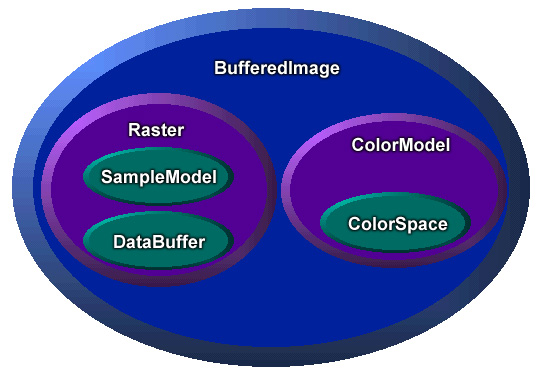
As shown in Figure 5-1, BufferedImage provides general image management. A
BufferedImage can be created directly in
memory and used to hold and manipulate image data retrieved from a
file or URL. A BufferedImage can be
displayed using any Graphics2D object
for a screen device, or rendered to any other destination using
appropriate Graphics2D context. A
BufferedImage object contains two other
objects: a Raster and a ColorModel.
The Raster class
provides image data management. It represents the rectangular
coordinates of the image, maintains image data in memory, and
provides a mechanism for creating multiple subimages from a single
image data buffer. It also provides methods for accessing specific
pixels within an image. A Raster object contains two other objects,
a DataBuffer and a SampleModel.
The DataBuffer class
holds pixel data in memory.
The SampleModel class
interprets data in the buffer and provides it as individual pixels
or rectangular ranges of pixels.
The ColorModel class
provides a color interpretation of pixel data provided by the
image’s sample model.
The image package provides additional classes that
define filtering operations on BufferedImage and Raster
objects. Each image processing operation is embodied in a class
that implements the BufferedImageOp
interface, the RasterOp interface, or
both interfaces. The operation class defines filter methods that performs the actual image
manipulation.
Figure 5-2 illustrates the basic model for Java 2D API image processing:
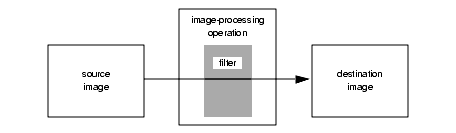
The operations supported include:
Note that if you’re interested just in
displaying and manipulating images, you only need to understand the
BufferedImage class and the filtering
operation classes. On the other hand, if you’re planning to
write filters or otherwise directly access image data, you’ll
need to understand the classes associated with BufferedImage.
Here are some terms used throughout the following discussions:
Data Elements: primitive types used as units of
storage of image data. Data elements are individual members of a
DataBuffer array. The layout of elements
in the data buffer is independent of the interpretation of the data
as pixels by an image’s SampleModel.
Samples: distinct members of the pixels of an
image. A SampleModel provides a
mechanism for converting elements in the DataBuffer to pixels and their samples. The samples
of a pixel may represent primary values in a particular color
model. For example, a pixel in an RGB color model consists of three
samples: red, green, and blue.
Components: values of pixels independent of color
interpretation. The distinction between component and sample is
useful with IndexColorModel, where pixel
components are indexes into the LookupTable.
Band: the set of all samples of one type in an image, such as all red samples or all green samples. Pixel data can be stored in a number of ways, the two supported in the Java 2D API being banded and pixel interleaved. Banded storage organizes image data by bands, and a pixel is made up of sample data from the same position in each band. Pixel interleaved storage organizes image data by pixels, with a single array containing all pixels, and bands consisting of the set of samples at the same index position in each pixel.
Primaries: distinct members of a color value in a specific color model; for example the RGB model forms color values from the primaries red, green, and blue.
The BufferedImage class
is the main class supporting the immediate imaging mode. It manages
an image in memory, providing ways to store pixel data, interpret
pixel data, and to render the pixel data to a Graphics or Graphics2D
context.
To create a BufferedImage, call the Component.createImage method; this returns a
BufferedImage whose drawing
characteristics match those of the component used to create
it—the created image is opaque, has the foreground and
background colors of the Component, and
you can’t adjust the transparency of the image. You could use
this technique when you want to do double buffered drawing for
animation in a component; the discussion “Drawing in an Offscreen
Buffer” gives more details.
    public Graphics2D createDemoGraphics2D(Graphics g) {
        Graphics2D g2 = null;
        int width = getSize().width;
        int height = getSize().height;

        if (offImg == null || offImg.getWidth() != width ||
                        offImg.getHeight() != height) {
            offImg = (BufferedImage) createImage(width, height);
        }

        if (offImg != null) {
            g2 = offImg.createGraphics();
            g2.setBackground(getBackground());
        }

        // .. clear canvas ..
        g2.clearRect(0, 0, width, height);

        return g2;
    }
You can also create a blank BufferedImage in memory using one of several
constructor methods provided.
The BufferedImage class
can be used to prepare graphic elements offscreen then copy them to
the screen. This technique is especially useful when a graphic is
complex or used repeatedly. For example, if you want to display a
complicated shape several times, you could draw it once into an
offscreen buffer and then copy it to different locations in the
window. By drawing the shape once and copying it, you can display
the graphics more quickly.
The java.awt package
facilitates the use of offscreen buffers by letting you draw to an
Image object the same way that you draw
to a window. All of the Java 2D API rendering features can
be used when drawing to offscreen images.
Offscreen buffers are often used for animation. For example, you could use an offscreen buffer to draw an object once and then move it around in a window. Similarly, you could use an offscreen buffer to provide feedback as a user moves a graphic using the mouse. Instead of redrawing the graphic at every mouse location, you could draw the graphic once to an offscreen buffer, and then copy it to the mouse location as the user drags the mouse.1
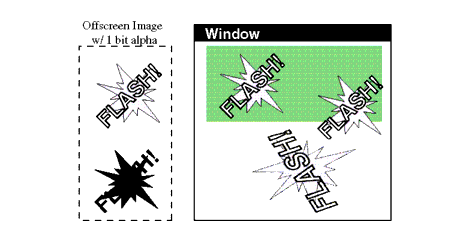
Figure 5-3 demonstrates how a program can draw to an offscreen image and then copy that image into a window multiple times. The last time the image is copied, it is transformed. Note that transforming the image instead of redrawing it with the transformation might produce unsatisfactory results.
The simplest way to create an image that you can
use as an offscreen buffer is to use the Component.createImage
method.
By creating an image whose color space, depth, and
pixel layout exactly match the window into which you are drawing,
the image can be efficiently blitted to a graphics device. This
allows drawImage to do its job
quickly.
You can also construct a BufferedImage object directly to use as an offscreen
buffer. This is useful when you need control over the offscreen
image’s type or transparency.
BufferedImage supports
several predefined image types:
TYPE_3BYTE_BGRTYPE_4BYTE_ABGRTYPE_4BYTE_ABGR_PRETYPE_BYTE_BINARYTYPE_BYTE_GRAYTYPE_BYTE_INDEXEDTYPE_CUSTOMTYPE_INT_ARGB_PRETYPE_INT_ARGBTYPE_INT_BGRTYPE_INT_RGBTYPE_USHORT_555_RGBTYPE_USHORT_565_RGBTYPE_INT_GRAYA BufferedImage object
can contain an alpha channel. In Figure 5-3, an alpha channel is
used to distinguish painted and unpainted areas, allowing an
irregular shape to appear over graphics that have already been
painted (in this case, a shaded rectangle). In other cases, you
might use alpha channel to blend the colors of the new image into
those in the existing image.
Note: unless you need alpha image data for transparency, as with the irregularly shaped images shown in Figure 5-2, you should avoid creating an off-screen buffer with alpha. Using alpha where it’s unnecessary slows rendering performance.
GraphicsConfiguration
provides convenience methods that automatically create buffered
images in a format compatible with your configuration. You can also
query the graphics configuration associated with the graphics
device on which the window resides to get the information you need
to construct a compatible BufferedImage
object.
To draw in a buffered image, you call its
BufferedImage.createGraphics method,
which returns a Graphics2D object. With
this object, you can call all of the Graphics2D methods to draw graphics primitives,
place text, and render other images in the image. This drawing
technique supports dithering and other enhancements provided by the
2D imaging package. The following code illustrates the use of
offscreen buffering:
public void update(Graphics g){Graphics2D g2 = (Graphics2D)g;if(firstTime){Dimension dim = getSize();int w = dim.width;int h = dim.height;area = new Rectangle(dim);bi = (BufferedImage)createImage(w, h); big = bi.createGraphics(); rect.setLocation(w/2-50, h/2-25); big.setStroke(new BasicStroke(8.0f)); firstTime = false; } // Clears the rectangle that was previously drawn. big.setColor(Color.white); big.clearRect(0, 0, area.width, area.height); // Draws and fills the newly positioned rectangle to the buffer. big.setPaint(strokePolka); big.draw(rect); big.setPaint(fillPolka); big.fill(rect); // Draws the buffered image to the screen. g2.drawImage(bi, 0, 0, this);}
In addition to drawing directly in a BufferedImage, you can directly access and
manipulate the image’s pixel data in a couple of ways. These
are useful if you’re implementing the BufferedImageOp filtering interface, as described in
“Image Processing and
Enhancement”.
You can use the BufferedImage.setRGB
methods to directly set the value of a pixel or a pixel array to a
specific RGB value. Note that no dithering is performed when you
modify pixels directly. You can also manipulate pixel data by
manipulating a WritableRaster object
associated with a BufferedImage
(see“Managing and
Manipulating Rasters”).
You can apply a filtering operation to a
BufferedImage using an object that
implements BufferedImageOp interface.
Filtering and the classes that provide this filtering interface are
discussed in “Image
Processing and Enhancement”.
To render a buffered image into a specific
context, call one of the drawImage
method of the context’s Graphics
object. For example, when rendering within a Component.paint method,
you call drawImage on the graphics
object passed to the method.
    public void paint(Graphics g) {

        if (getSize().width <= 0 || getSize().height <= 0)
            return;

        Graphics2D g2 = (Graphics2D) g;

        if (offImg != null && isShowing())  {
            g2.drawImage(offImg, 0, 0, this);
        }
    }
A BufferedImage object
uses a Raster to manage its rectangular
array of pixel data. The Raster class
defines fields for the image’s coordinate system—width,
height, and origin. A Raster object
itself uses two objects to manage the pixel data, a DataBuffer and a SampleModel. The DataBuffer is the object that stores pixel data for
the raster (as described on ), and the SampleModel provides the interpretation of pixel
data from the DataBuffer (as described
on ).
In most cases, you don’t need to create a
Raster directly, since one is supplied
with any BufferedImage that you create
in memory. However, one of the BufferedImage constructor methods allows you to
create a Raster by passing in a
WritableRaster.
The Raster class
provides a number of static factory methods for creating
Rasters with the DataBuffers and SampleModels you specify. You can use these
factories when implementing RasterOp
filtering classes.
The Raster class
incorporates the concept of parent and child rasters. This can
improve storage efficiency by allowing you to construct any number
of buffered images from the same parent. The parent and its
children all refer to the same data buffer, and each child has a
specific offset and bounds to identify its image location in the
buffer. A child identifies its ownership through its getParent method.
To create a subraster, you use the Raster.createSubRaster
method.When you create a subraster, you identify the area of its
parent that it covers and its offset from the parent’s
origin.
The Raster class
defines a number of ways to access pixels and pixel data. These are
useful when you’re implementing the RasterOp interface, which provides raster-level
filtering and manipulation of image data, or when implementing any
method that needs to perform low-level pixel manipulation.
The Raster.getPixel
methods let you get an individual pixel, which is returned as
individual samples in an array. The Raster.getDataElements
methods return a specified run of uninterpreted image data from the
DataBuffer. The Raster.getSample method
returns samples of an individual pixel. The getSamples method returns a band for a particular
region of an image.
In addition to these methods, you can also access
the data buffer and the sample model through instance variables of
the Raster class. These objects provide
additional ways to access and interpret the Raster’s pixel data.
The WritableRaster
subclass provides methods for setting pixel data and samples. The
Raster associated with a BufferedImage is actually a WritableRaster, thus providing full access to
manipulate its pixel data.
The DataBuffer
belonging to a Raster represents an
array of image data. When you create a Raster directly or through the BufferedImage constructors, you specify a width and
height in pixels, along with a SampleModel for the image data. This information is
used to create a DataBuffer of the
appropriate data type and size.
There are three subclasses of DataBuffer, each representing a different type of
data element:
DataBufferByte (represents 8-bit
values)DataBufferInt (represents 32-bit
values)DataBufferShort (represents 16-bit
values)DataBufferUShort (represents
unsigned short values)As defined earlier, elements are the discrete
members of the array of the data buffer, and components or samples
are the discrete values that together make up a pixel. There can be
various mappings between a particular type of element in a
DataBuffer and a particular type of
pixel represented by a SampleModel. It
is the responsibility of the various SampleModel subclasses to implement that mapping and
provide a way to get specific pixels from a specific DataBuffer.
DataBuffer constructors
provide ways to create buffers of a specific size and a specific
number of banks.
While you can access image data in a DataBuffer directly, it’s generally easier and
more convenient to do so through the methods of the Raster and WritableRaster
classes.
The abstract SampleModel class defines methods for extracting
samples of an image without knowing how the underlying data is
stored. The class provides fields for tracking the height and width
of the image data in the associated DataBuffer, and for describing the number of bands
and the data type of that buffer. SampleModel methods provide image data as a
collection of pixels, with each pixel consisting of a number of
samples or components.
The java.awt.image
package provides five types of sample models:
ComponentSampleModel—used to
extract pixels from images that store sample data in separate data
array elements in one bank of a DataBuffer.BandedSampleModel—used to
extract pixels from images that store each sample in a separate
data element with bands stored in a sequence of data elementsPixelInterleavedSampleModel—used to extract
pixels from images that store each sample in a separate data
element with pixels stored in a sequence of data elements.MultiPixelPackedSampleModel—used to extract
pixels from single banded images that store multiple one-sample
pixels in one data element.SinglePixelPackedSampleModel—used to extract
samples from images that store sample data for a single pixel in
one data array element in the first bank of a DataBuffer.Pixel data presented by the SampleModel may or may not correlate directly to a
color data representation of a particular color model, depending on
the data source. For example, in photographic image data, the
samples may represent RGB data. In image data from a medical
imaging device, samples can represent different types of data such
as temperature or bone density.
There are three categories of methods for
accessing image data. The getPixel
methods return a whole pixel as an array, with one entry for each
sample. The getDataElement methods
provide access to the raw, uninterpreted data stored in the
DataBuffer. The getSample methods provide access to pixel components
for a specific band.
In addition to the Raster object for managing image data, the
BufferedImage class includes a
ColorModel for interpreting that data as
color pixel values. The abstract ColorModel class defines methods for turning an
image’s pixel data into a color value in its associated
ColorSpace.
The java.awt.image
package provides four types of color models:
PackedColorModel—An abstract
ColorModel that represents pixel values
that have color components embedded directly in the bits of an
integer pixel. A DirectColorModel is a
subclass of PackedColorModel.DirectColorModel—a
ColorModel that represents pixel values
that have RGB color components embedded directly in the bits of the
pixel itself. DirectColorModel model is
similar to an X11 TrueColor visual.ComponentColorModel—a
ColorModel that can handle an arbitrary
ColorSpace and an array of color
components to match the ColorSpace.IndexColorModel—a ColorModel that represents pixel values that are
indices into a fixed color map in the sRGB color space.Based on data in the DataBuffer, the SampleModel provides the ColorModel with a pixel, which the ColorModel then interprets as a color.
A lookup table contains data for one or more
channels or image components; for example, separate arrays for R,
G, and B. The java.awt.image package
defines two types of lookup tables that extend the abstract
LookupTable class, one that contains
byte data and one that contains short data (ByteLookupTable and ShortLookupData).
The image package provides a pair of interfaces
that define operations on BufferedImage
and Raster objects: BufferedImageOp and RasterOp.
The classes that implement these interfaces
include AffineTransformOp, BandCombineOp, ColorConvertOp, ConvolveOp,
LookupOp, RescaleOp. These classes can
be used to geometrically transform, blur, sharpen, enhance
contrast, threshold, and color correct images.
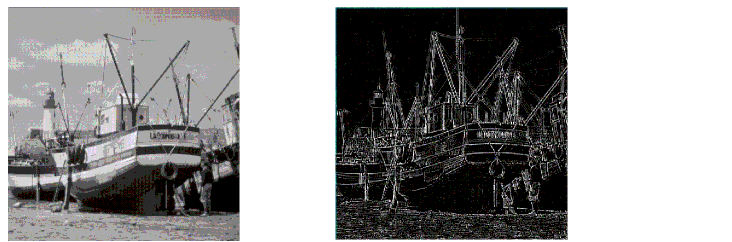
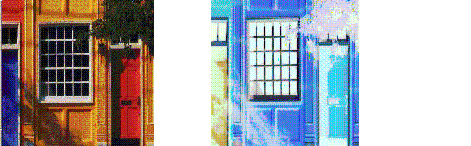
Figure 5-4 illustrates edge detection and enhancement, an operation that emphasizes sharp changes in intensity within an image. Edge detection is commonly used in medical imaging and mapping applications. Edge detection is used to increase the contrast between adjacent structures in an image, allowing the viewer to discriminate greater detail.
The following code illustrates edge detection:
float[] elements = { 0.0f, -1.0f, 0.0f,
                    -1.0f, 4.f, -1.0f,
                    0.0f, -1.0f, 0.0f};
...

BufferedImage bimg = new BufferedImage(bw,bh,BufferedImage.TYPE_INT_RGB);
Kernel kernel = new Kernel(3, 3, elements);
ConvolveOp cop = new ConvolveOp(kernel, ConvolveOp.EDGE_NO_OP,                                             null);
cop.filter(bi,bimg);
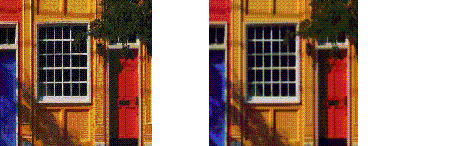
Figure 5-5 demonstrates lookup table manipulation. A lookup operation can be used to alter individual components of a pixel.
The following code demonstrates Lookup-table manipulation:
        byte reverse[] = new byte[256];
   for (int j=0; j<200; j++){
                reverse[j]=(byte)(256-j);
        }
        ByteLookupTable blut=new ByteLookupTable(0, reverse);
        LookupOp lop = new LookupOp(blut, null);
   lop.filter(bi,bimg);
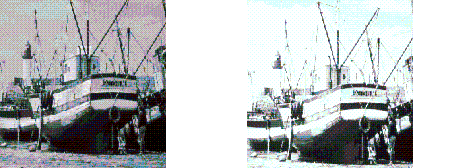
Figure 5-6 illustrates rescaling. Rescaling can increase or decrease the intensity of all points. Rescaling can be used to increase the dynamic range of an otherwise neutral image, bringing out detail in a region that appears neutral or flat.
The following code snippet illustrates rescaling:
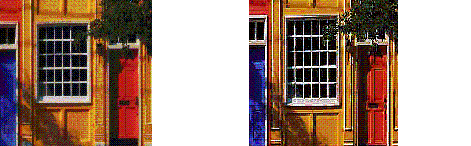
Convolution is the process that underlies most spatial filtering algorithms. Convolution is the process of weighting or averaging the value of each pixel in an image with the values of neighboring pixels.This allows each output pixel to be affected by the immediate neighborhood in a way that can be mathematically specified with a kernel. Figure 5-7 illustrates Convolution.
The following code fragment illustrates how to use
one of the image processing classes, ConvolveOp. In this example, each pixel in the
source image is averaged equally with the eight pixels that
surround it.
float weight = 1.0f/9.0f;float[] elements = new float[9]; // create 2D array// fill the array with nine equal elements
for (i = 0; i < 9; i++) {   elements[i] = weight;}// use the array of elements as argument to create a Kernelprivate Kernel myKernel = new Kernel(3, 3, elements);public ConvolveOp simpleBlur = new ConvolveOp(myKernel);

// sourceImage and destImage are instances of BufferedImagesimpleBlur.filter(sourceImage, destImage) // blur the image
The variable simpleBlur contains a new instance of
ConvolveOp that implements a blur
operation on a BufferedImage or a
Raster. Suppose that sourceImage and
destImage are two instances of BufferedImage. When you call filter, the core method of the ConvolveOp class, it sets the value of each pixel in
the destination image by averaging the corresponding pixel in the
source image with the eight pixels that surround it.
The convolution kernel in this example could be represented by the following matrix, with elements specified to four significant figures:

When an image is convolved, the value of each pixel in the destination image is calculated by using the kernel as a set of weights to average the pixel’s value with the values of surrounding pixels. This operation is performed on each channel of the image.
The following formula shows how the weights in the kernel are associated with the pixels in the source image when the convolution is performed. Each value in the kernel is tied to a spatial position in the image.

The value of a destination pixel is the sum of the products of the weights in the kernel multiplied by the value of the corresponding source pixel. For many simple operations, the kernel is a matrix that is square and symmetric, and the sum of its weights adds up to one.2
The convolution kernel in this example is
relatively simple. It weights each pixel from the source image
equally. By choosing a kernel that weights the source image at a
higher or lower level, a program can increase or decrease the
intensity of the destination image. The Kernel object, which is set in the ConvolveOp constructor, determines the type of
filtering that is performed. By setting other values, you can
perform other types of convolutions, including blurring (such as
Gaussian blur, radial blur, and motion blur), sharpening, and
smoothing operations. Figure 5-8 illustrates sharpening
using Convolution.
The following code snippet illustrates sharpening with Convolution:
float[] elements = { 0.0f, -1.0f, 0.0f,
                    -1.0f,  5.f, -1.0f,
                     0.0f, -1.0f,  0.0f};
...

Kernel kernel = new Kernel(3,3,elements);
ConvolveOp cop = new ConvolveOp(kernel, ConvolveOp.EDGE_NO_OP,                                                                                                          null);
        cop.filter(bi,bimg);
| Contents | Previous | Next |